International Baccalaureate · PYP 4
2D Shapes
I
Lines, Segments and Rays
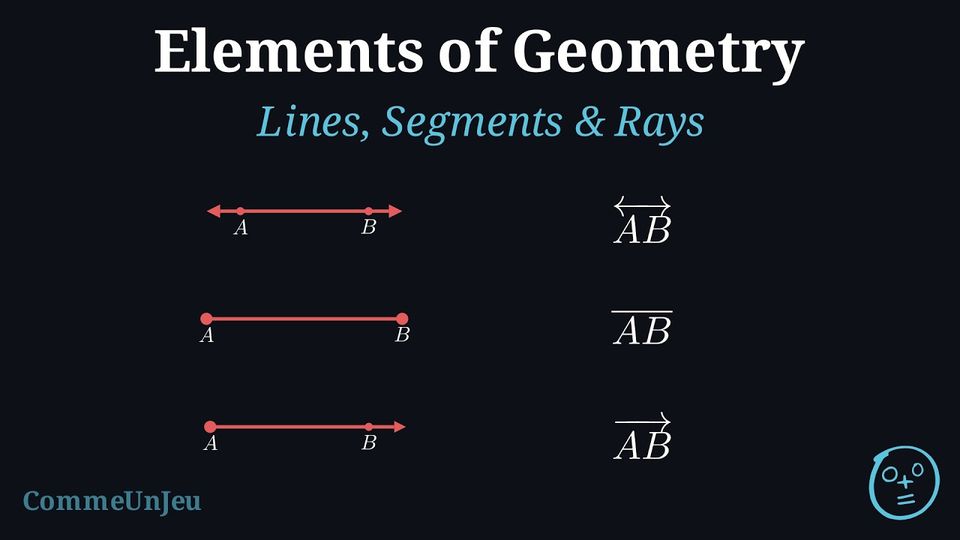
Definition — Line
A line is a straight path that goes on forever in both directions. 
Definition — Line Notation
We name a line using any two distinct points on it, written as \(\Line{AB}\). We read this as “line \(AB\)”. 
Proposition — Lines through Points
Through two distinct points passes exactly one line. Through a single point pass infinitely many lines. Three points are not always on the same line: often no line passes through all three. 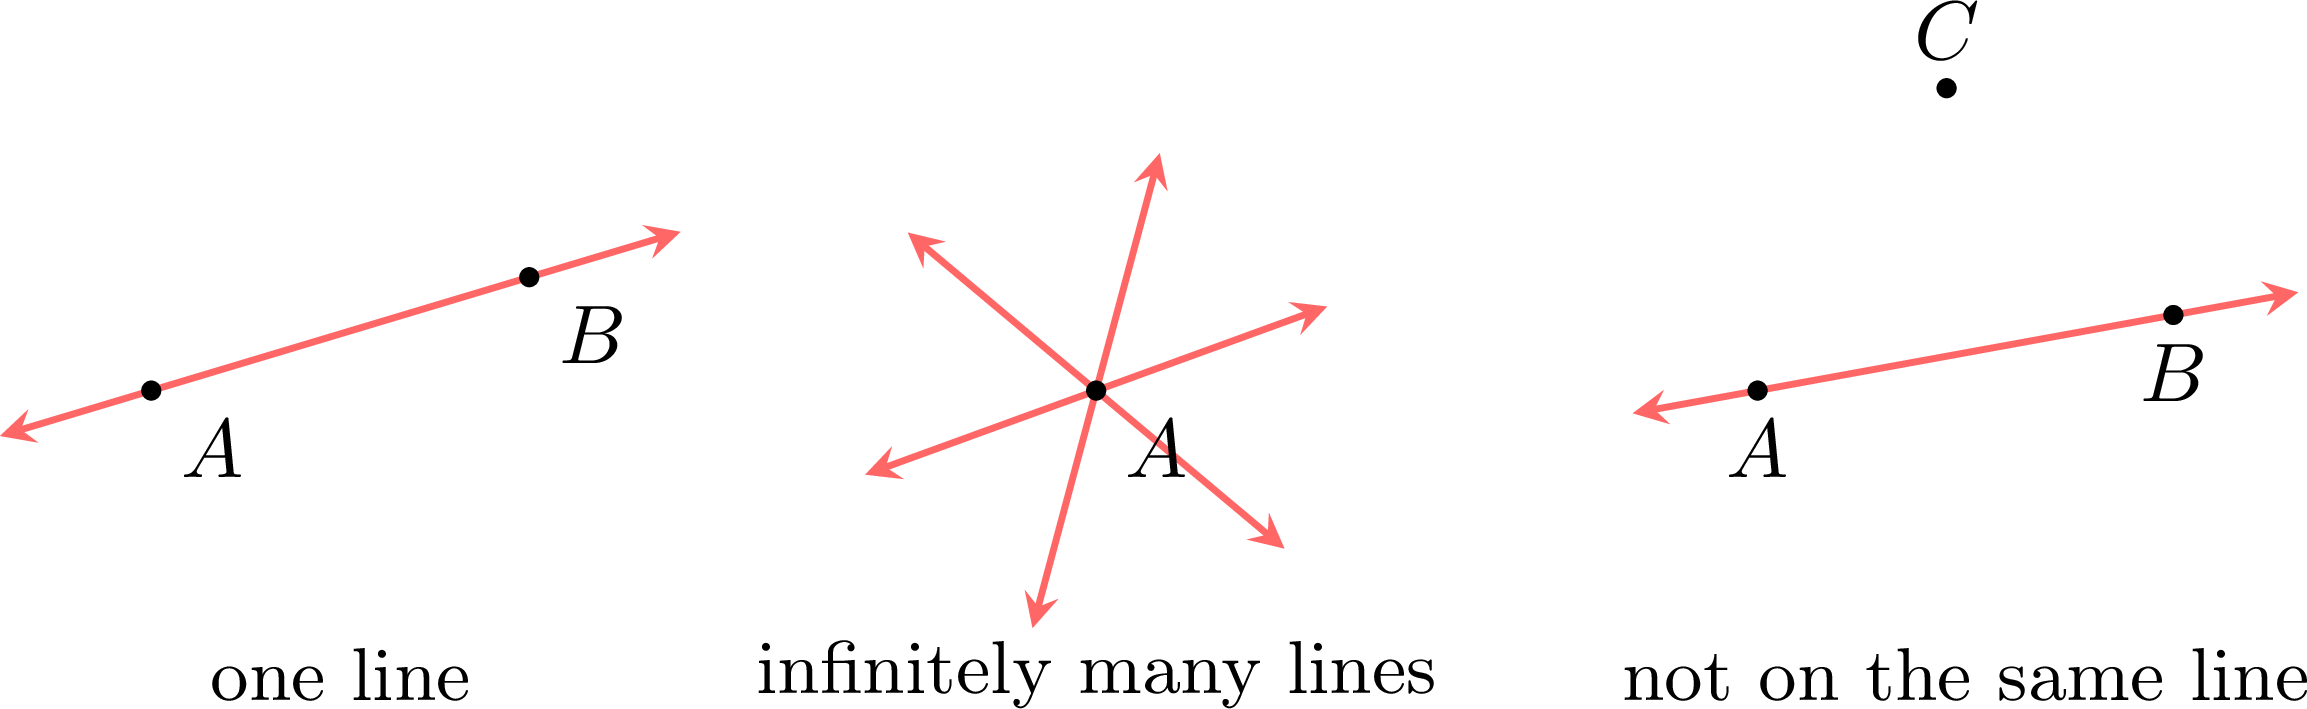

Definition — Line Segment
A line segment is the part of a line between two endpoints. It has a fixed length. 
Definition — Line Segment Notation
We name a line segment by its endpoints, written as \(\Segment{AB}\). We read this as “segment \(AB\)”. 

Definition — Ray
A ray is a part of a line that starts at one endpoint and goes on forever in one direction. 
Definition — Ray Notation
We name a ray by its endpoint first and another point on it, written as \(\Ray{AB}\). We read this as “ray \(AB\)”. 

Method — Drawing with the Ruler
A plain ruler has one straight edge and no numbers: it only lets us join points. A graduated ruler carries a scale as well, so it also lets us measure a length and draw one. - To join two points: place the edge of the ruler against both points at once, then draw along the edge from one point to the other.
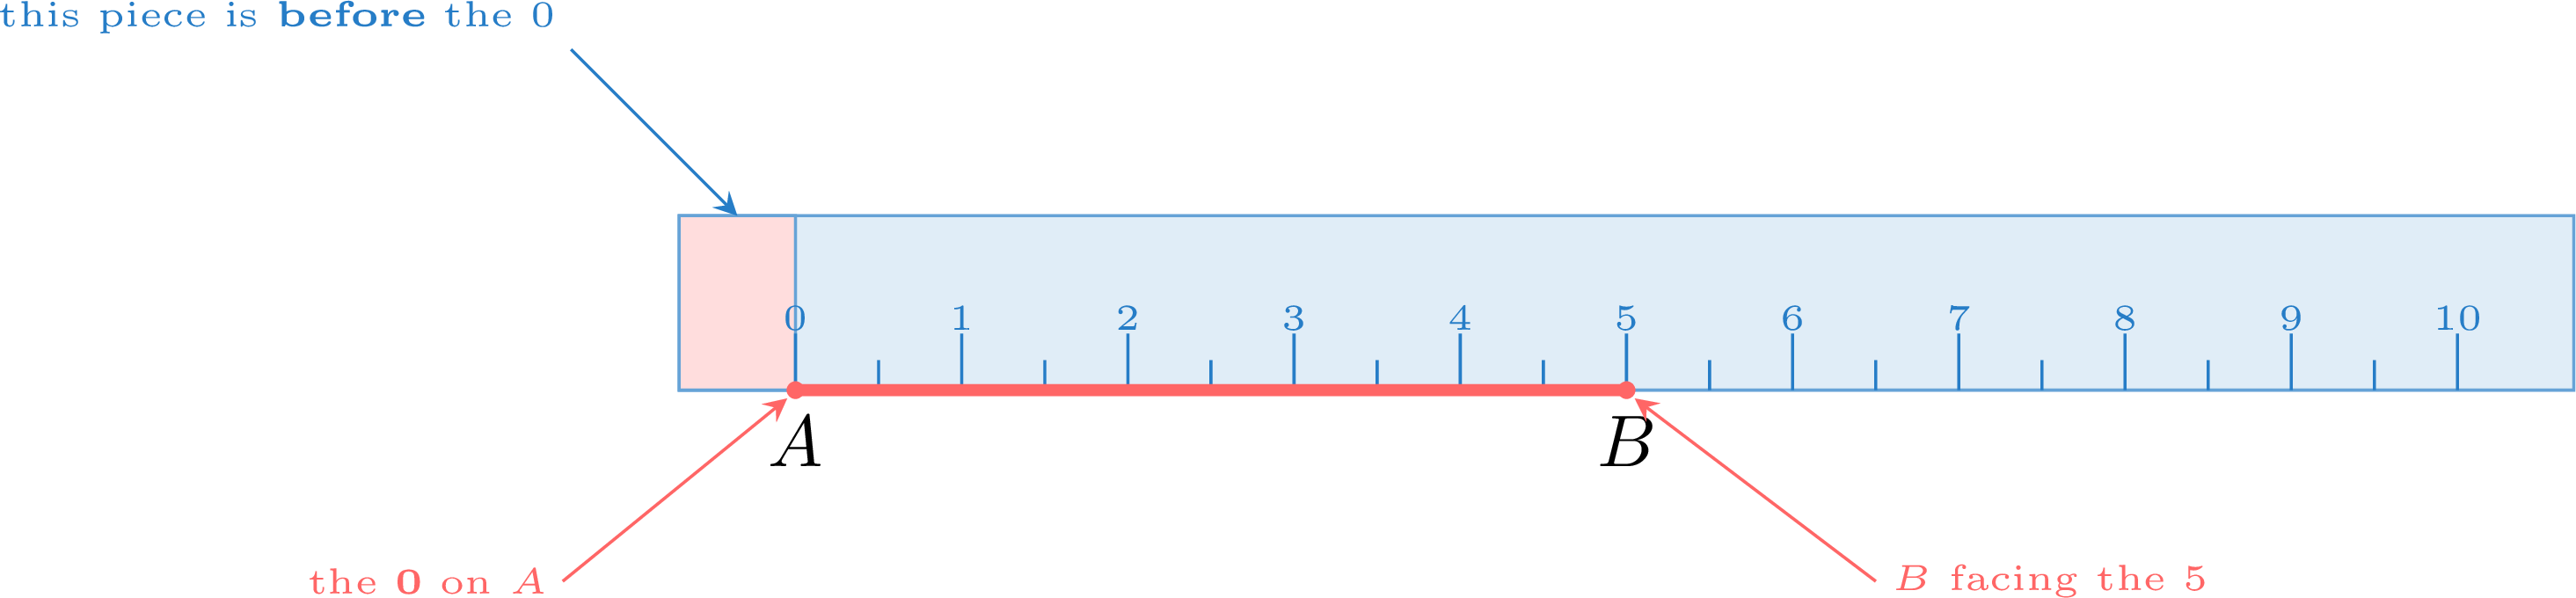
- To draw a segment of a given length: place the 0 of the scale on the first point — the 0, never the end of the ruler, because on a real ruler there is often a little piece of ruler before the 0. Turn the edge in the direction wanted, mark the second point facing the graduation asked for, then join the two points.
- To copy a length: put the 0 on one end of the given segment and read its length; then draw a new segment of that same length.
Example
Hugo wants to draw a segment \(\Segment{AB}\) with \(AB = 6\) cm. He has laid his graduated ruler as shown, with the end of the ruler on \(A\), and he has marked \(B\) facing the graduation \(6\). Is his segment \(6\) cm long? 
No: it is too long. The end of the ruler is not the \(0\) — there is a little piece of ruler before it. By putting that end on \(A\), Hugo pushed the whole scale away from \(A\), so the graduation \(6\) is farther from \(A\) than \(6\) cm. To get it right he must slide the ruler until the \(0\) sits on \(A\).
Example
Here is a segment \(\Segment{MN}\) and, below it, a lone point \(P\). How do we draw a segment starting at \(P\) that is exactly as long as \(\Segment{MN}\)? 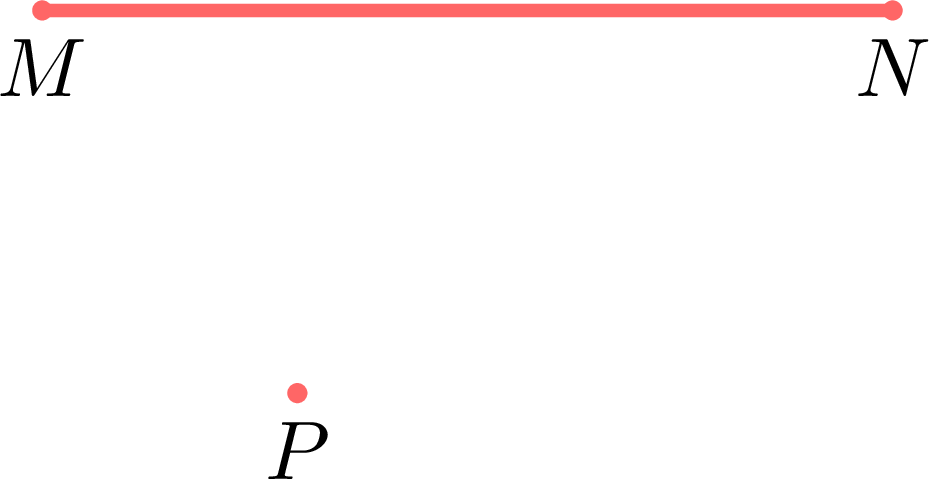
In two moves. First read the length: put the \(0\) on \(M\), lay the edge along the segment, and read the number facing \(N\) — here \(4\) cm. Then draw it: put the \(0\) on \(P\), turn the edge in any direction wanted, mark the point facing \(4\), and join. The new segment is \(4\) cm long, so it is as long as \(\Segment{MN}\) even though it does not point the same way.
Skills to practice
- Recognising Lines, Segments and Rays
- Naming Lines, Segments and Rays
- Checking a Construction Program
- Counting Possible Lines
- Drawing on the Grid
- Drawing Lines, Segments and Rays
- Drawing with the Graduated Ruler
II
Right-angled Triangles and Polygons
Definition — Right-angled triangle
A right-angled triangle is a triangle that has a right angle. To check it, place the right angle of the set square on one corner of the triangle: if the two sides are aligned with its two edges, that corner is a right angle and the triangle is right-angled. On a figure, that right angle is marked with its small square, the code of the right angle. 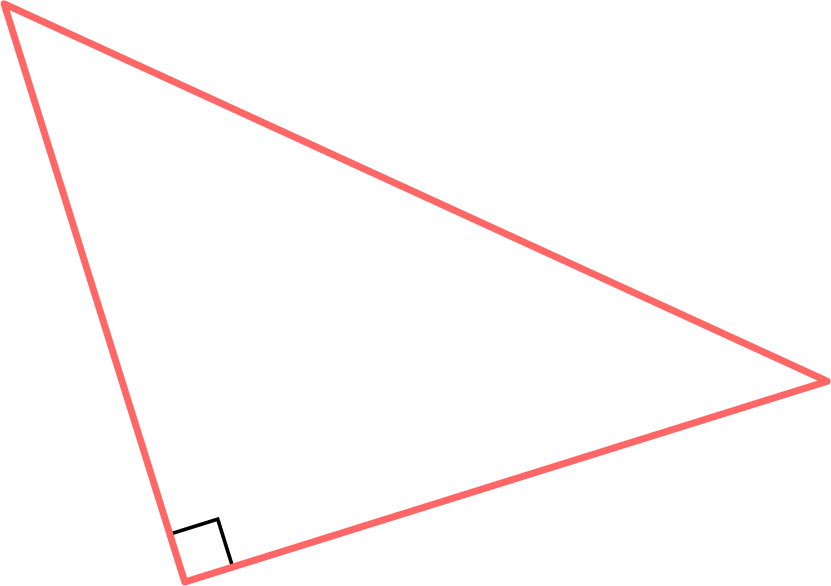
Skills to practice
- Recognising Right-angled Triangles
- Checking and Drawing Polygons
III
The Circle
Noah is marking out a round flower bed in the garden. Walking around what he hopes is a circle, he traces a wobbly loop: judged by eye alone, “round” is not precise enough to mark on the ground. 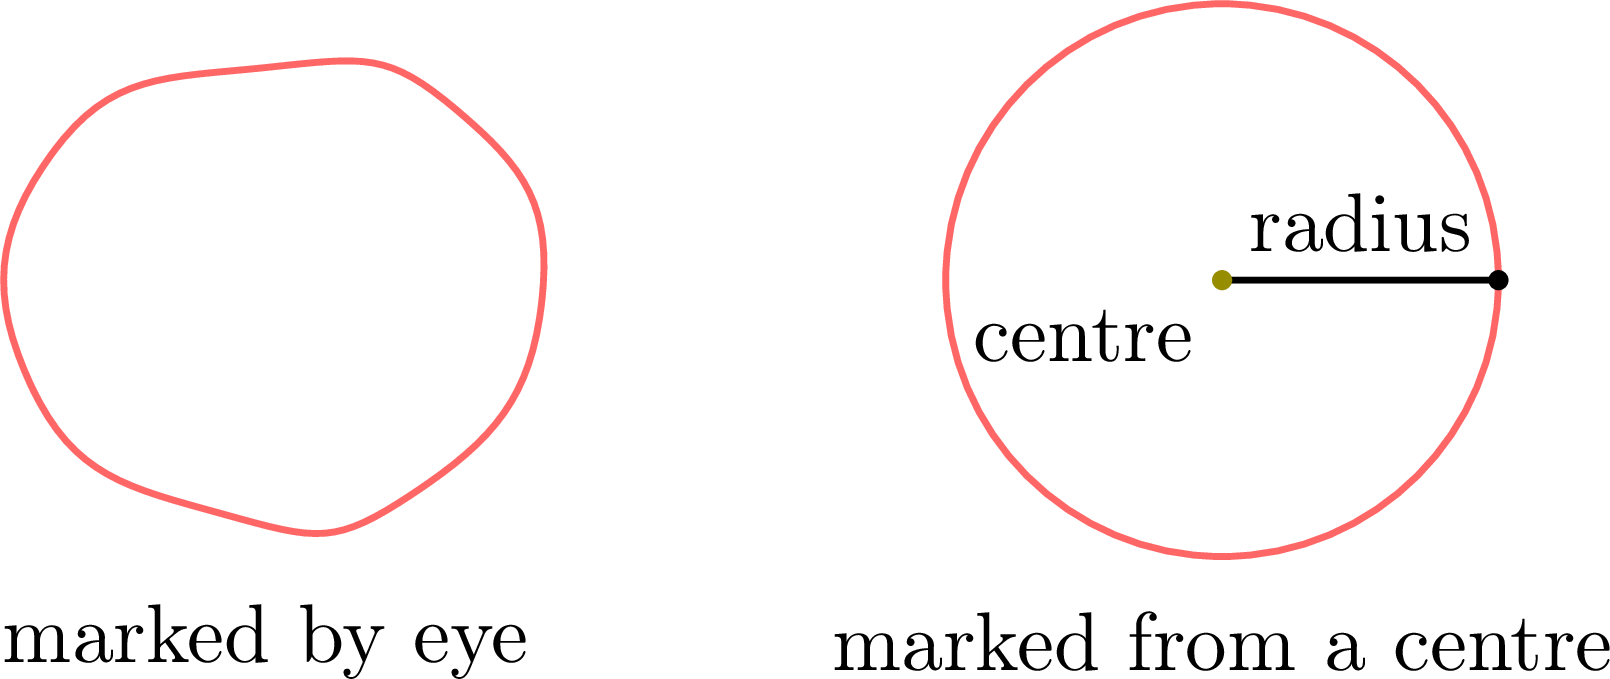
A circle is fixed by a property, not by a look: every point of it lies the same distance — the radius — from a single point, the centre. Noah drives a peg at the centre and ties to it a string as long as the chosen radius. Holding the string taut and walking it around, every step stays exactly that distance from the peg, so the path traced is a true circle. The centre and the radius are all that is needed to determine it.
Definition — Circle
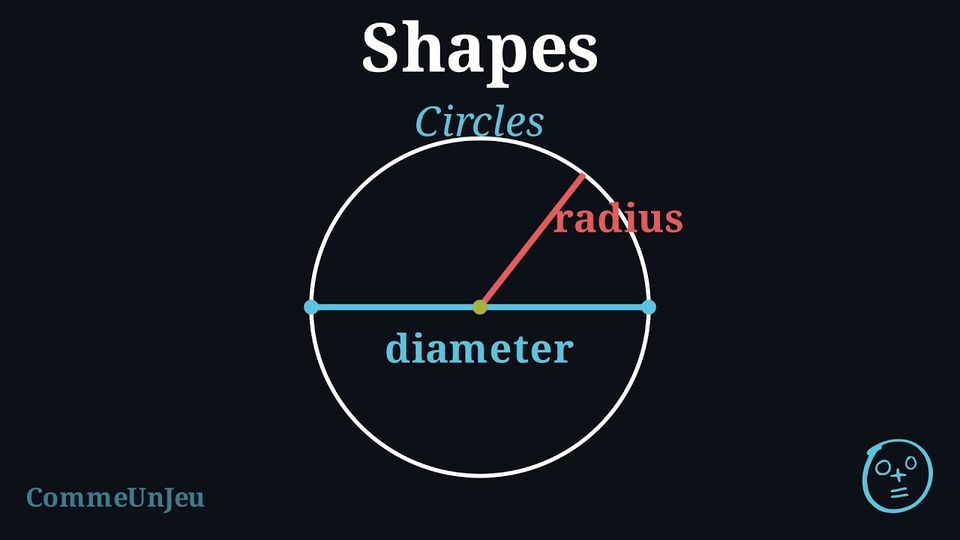
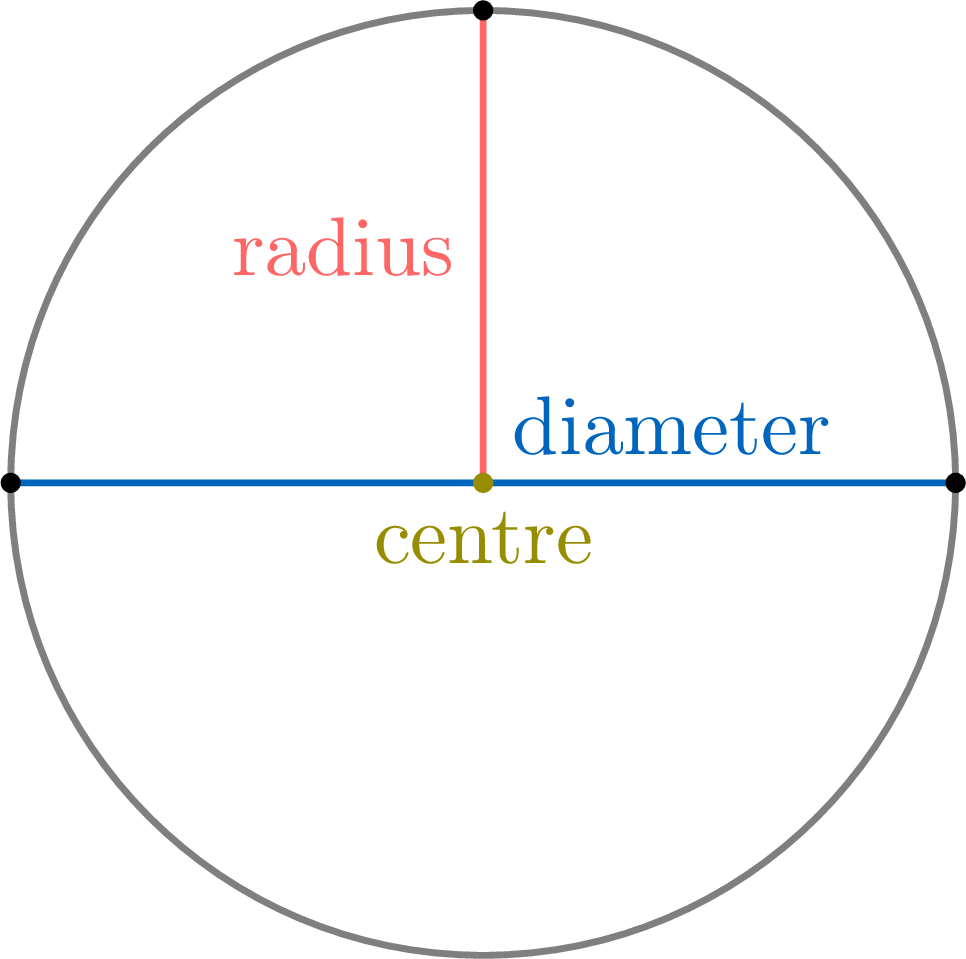
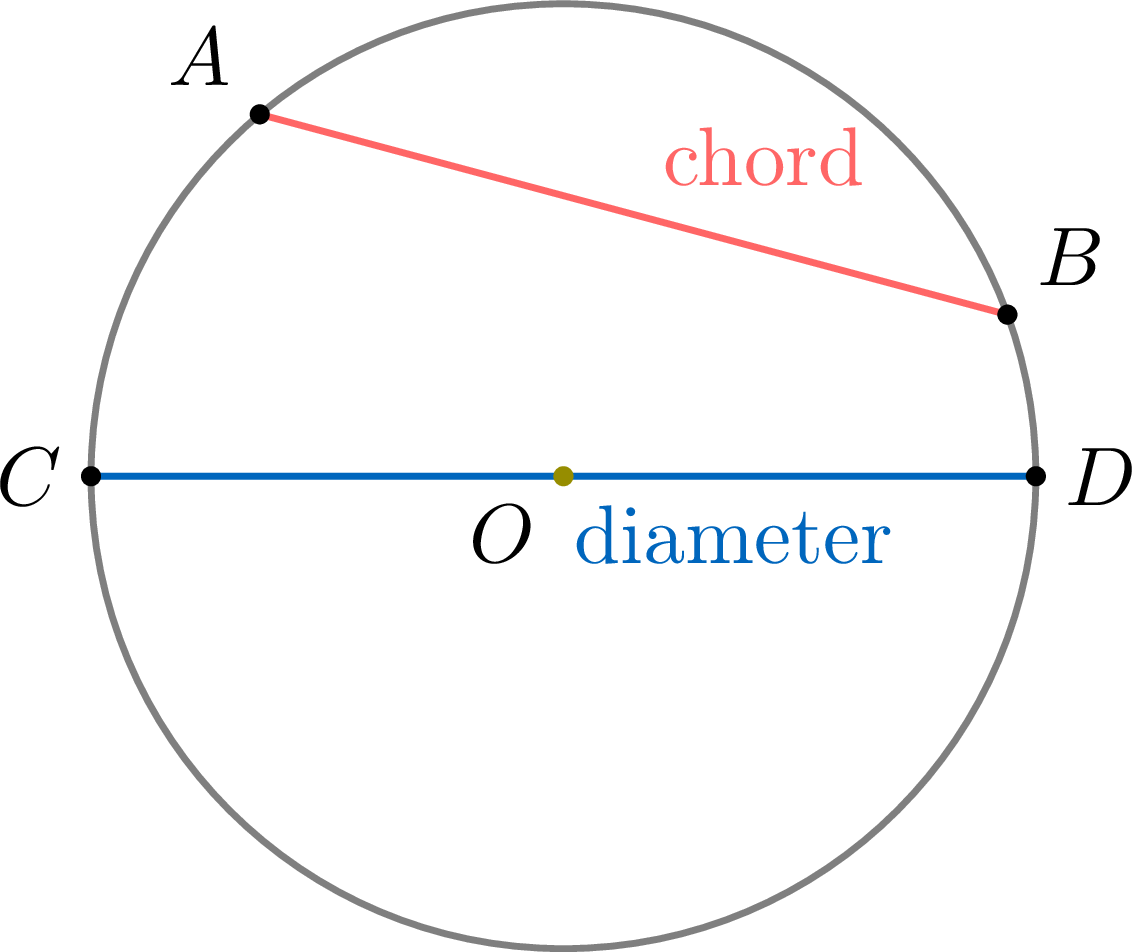
A circle is a closed curved line on a flat surface — only the line, not the inside. Every point on the circle is the same distance from a point called the centre.The radius is a line segment from the centre to a point on the circle. The radius is also the length of this segment.
The diameter is a line segment that goes across the circle through the centre and connects two points on the circle. The diameter is also the length of this segment.
Definition — Disc
A circle is only the curve — the boundary line itself. A disc is the whole flat region the circle encloses: the circle together with every point inside it. 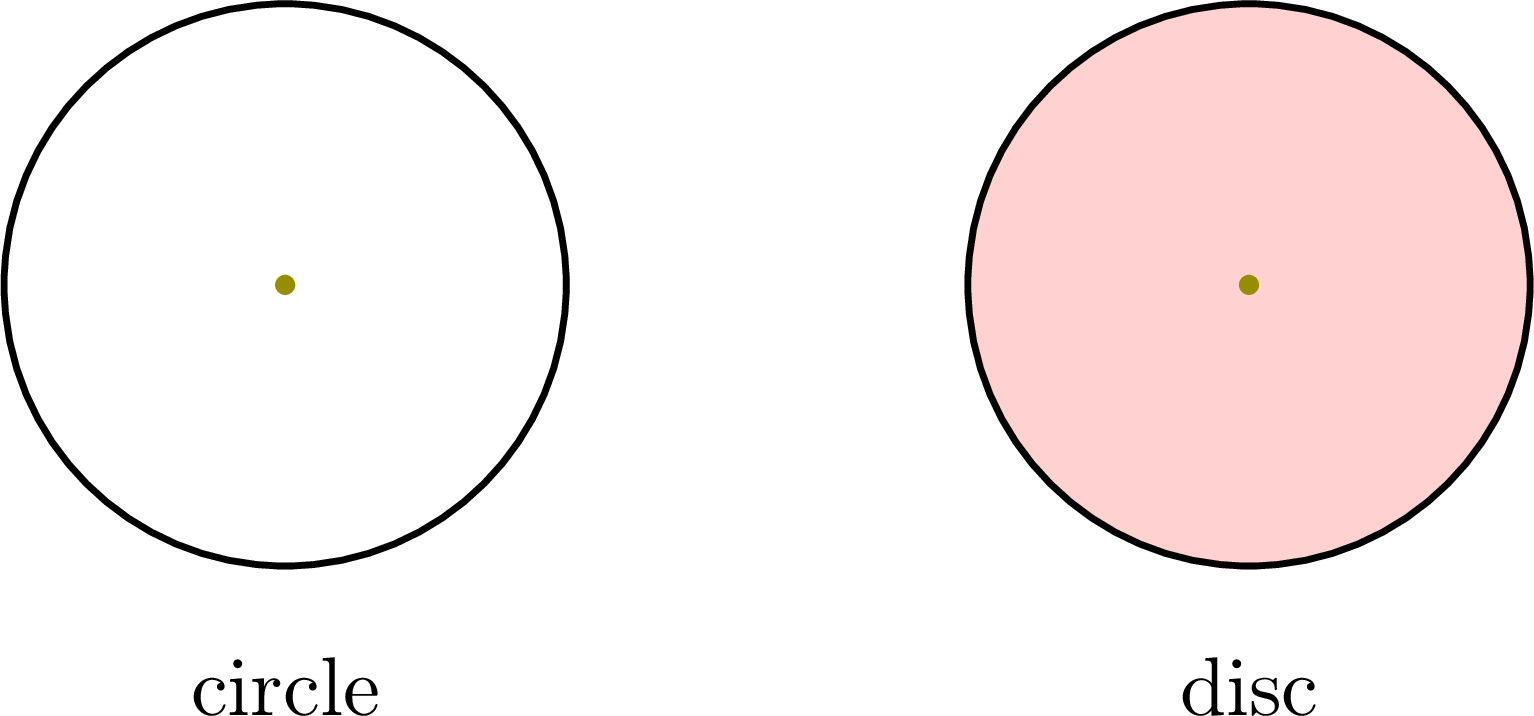
Proposition — Diameter-Radius Rule
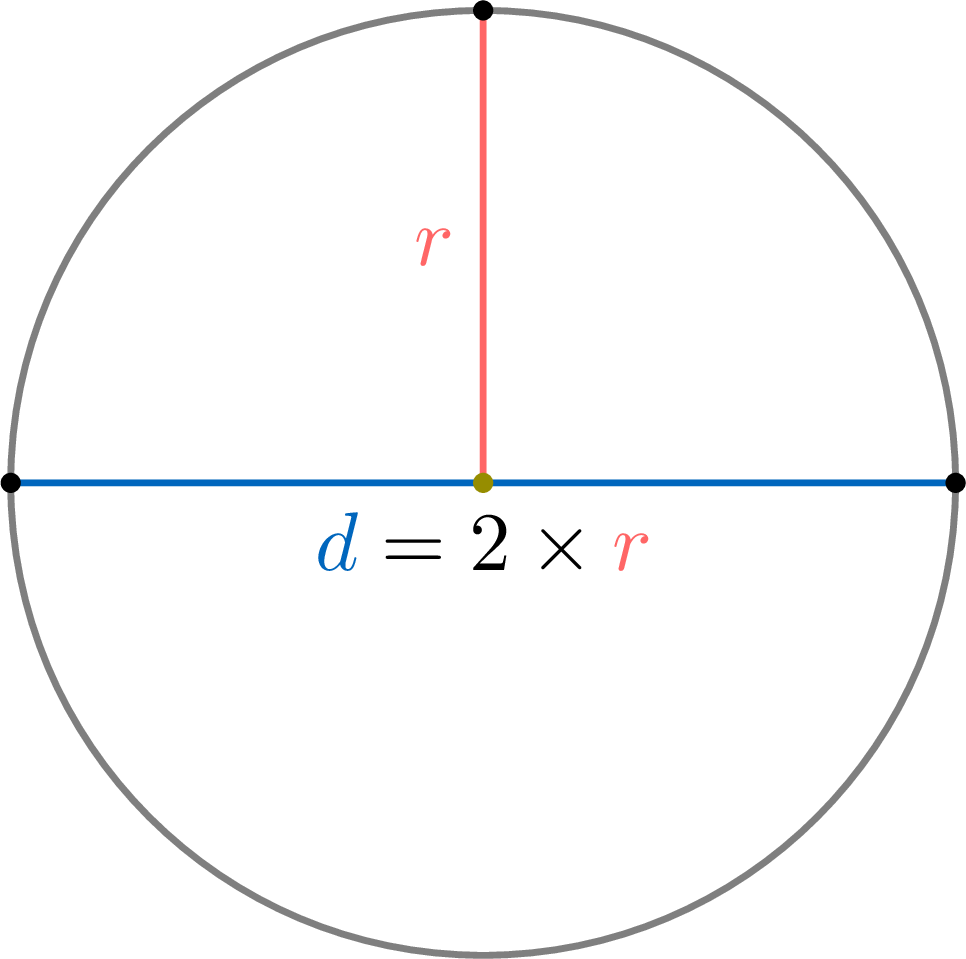
- The diameter is twice as long as the radius.
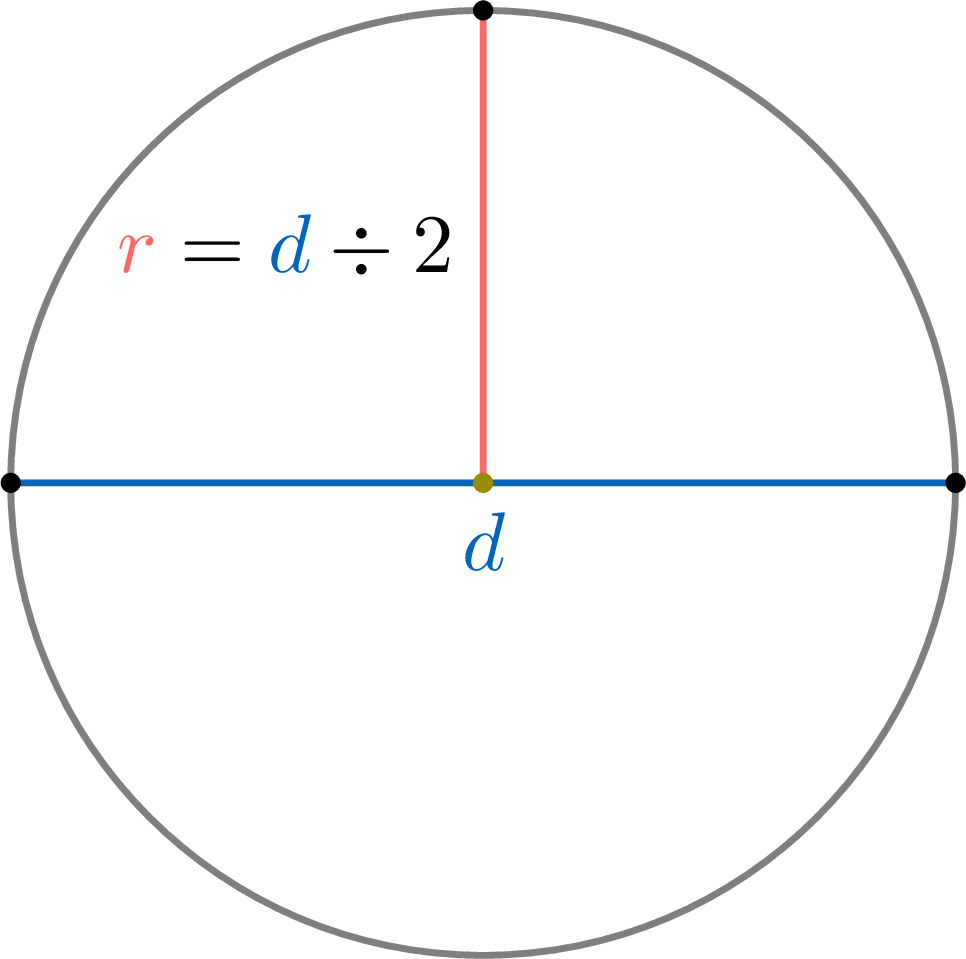
- The radius is half of the diameter.
Definition — Chord
A chord is a line segment whose two endpoints are on the circle.Every chord that passes through the centre is a diameter: a diameter is the longest chord of the circle.
Skills to practice
- Telling a Circle, a Disc and a Chord Apart
- Finding Diameters and Radii
IV
Reproducing a Figure
Method — Reproducing a Figure on Squared Paper
To reproduce a figure is to draw it again exactly the same: same shape, same size. On squared paper we never need to measure — we count squares. - Choose a starting vertex on the model, one that sits on a corner of the grid, and mark the matching corner on the grid of the copy.
- Place each other vertex by counting, from the starting vertex, how many squares to go across and how many to go up or down. Mark it on the grid of the copy after the same count.
- Join the vertices with the ruler, in the same order as on the model.
- Check at the end: same number of sides and, for each side, the same number of squares to go across and to go up or down as on the model.
Example
Here is a figure with two slanting sides. Starting from its bottom-left vertex, how do we place the top vertex and the one on its right? 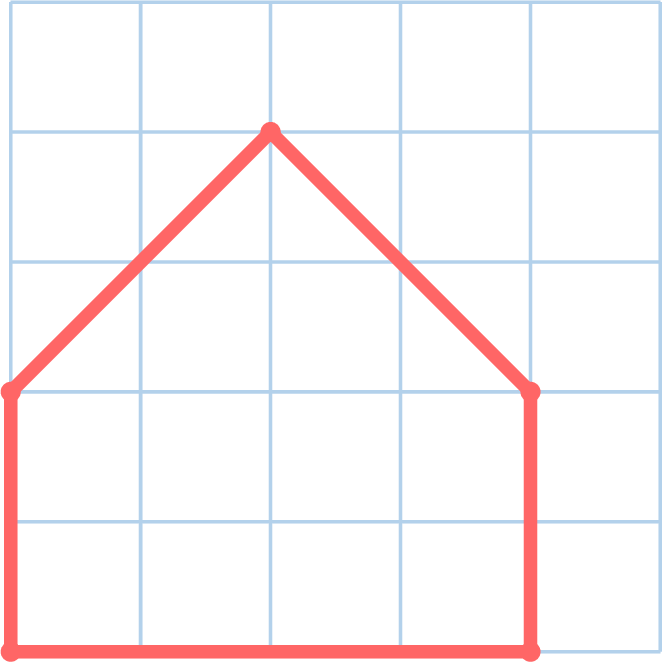
By counting, never by measuring. From the bottom-left vertex, the right-hand vertex is \(4\) squares across and \(2\) squares up. The top vertex is \(2\) squares across and \(4\) squares up. Once the two are marked, the slanting side is drawn simply by joining them with the ruler — and it comes out exactly right, without a single measurement. 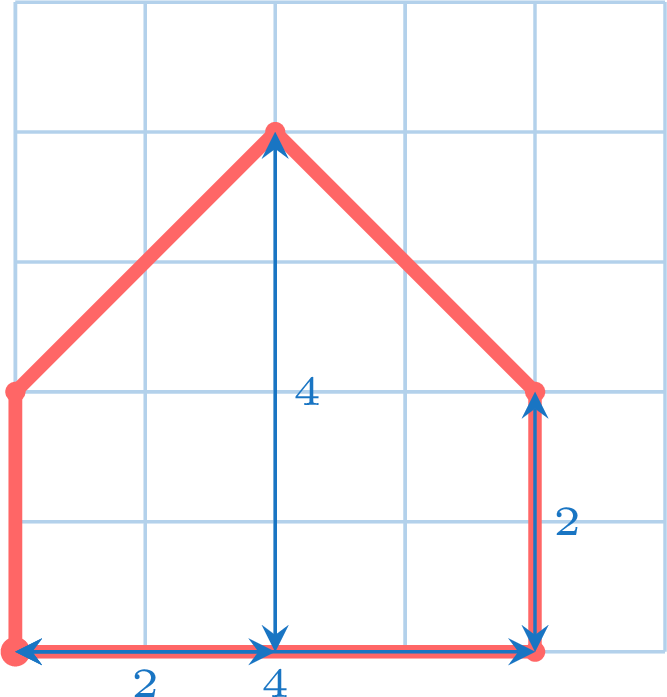
Example
Sami reproduces this figure. He starts at the bottom-left vertex, and to place the vertex above it he counts the lines of the grid: he finds \(4\) and goes up \(4\) squares. Where does his figure go wrong? 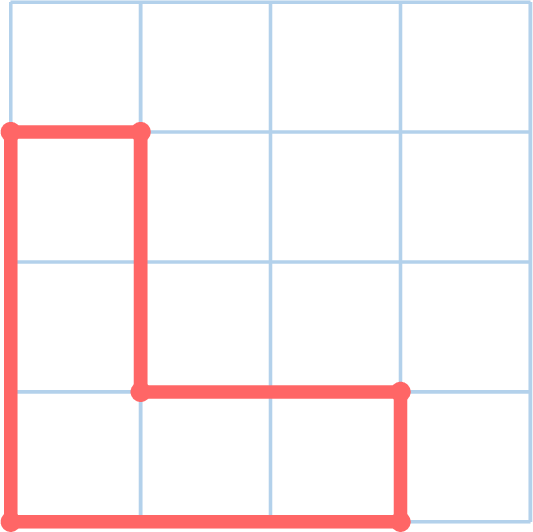
He went up one square too far. Between the two vertices there are indeed \(4\) lines of the grid, but only \(3\) squares — the first line is the one he started on and it counts for nothing. His side is \(4\) squares instead of \(3\), so his figure is taller than the model and no longer the same figure. Count the squares, or count the lines and take away one. 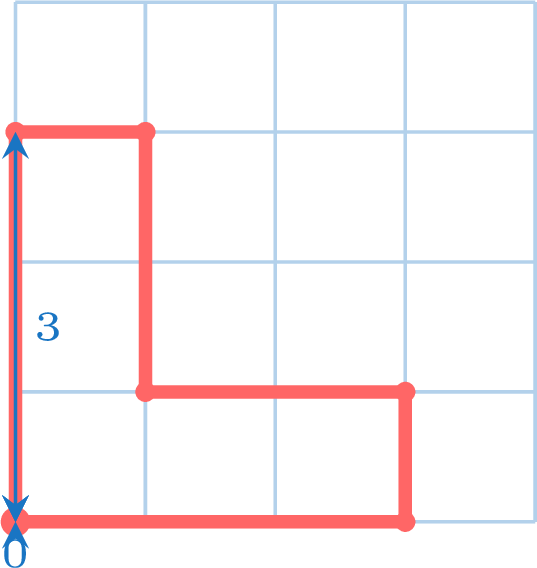
Skills to practice
- Reproducing a Figure on Squared Paper
V
Going further
Skills to practice
- Reasoning with Circles and Lines
- Quiz
Jump to section